Airflow in ECS with Redis - Part 2: Hands On

M
I'm Mariano, I am from 🇦🇷 and live in 🇳🇱. I am a Cloud Engineer 9-5 and many other things 5-9.
Search for a command to run...
I'm Mariano, I am from 🇦🇷 and live in 🇳🇱. I am a Cloud Engineer 9-5 and many other things 5-9.
No comments yet. Be the first to comment.
Here is how to deploy Airflow in ECS in different ways, from Terraform to docker compose native integration.
How to set up a containerised Airflow installation in AWS ECS using Redis as its queue orchestrator. A bit of background A few years ago I joined a Data team where we processed a lot of analytics information coming from online search engines. This ET...
Add Infra and application code, mix it up, profit

A tote bag phrase applied to Terraform code

Or how to get richer information about someone's experience by asking differently

I like the CLI and a black background console when it comes to checking on things and debugging, it makes me feel more confident in what I'm seeing and closer to the basics. A big chunk of my recent years has been all about Kubernetes. Kubernetes th...

Wait, what? Don't panic, SOPS will encrypt them for you. Big NO NO Secrets (a.k.a. sensitive values), such as passwords or any other potentially harmful information must be protected, we all know that. That's why you should avoid sharing those or pu...

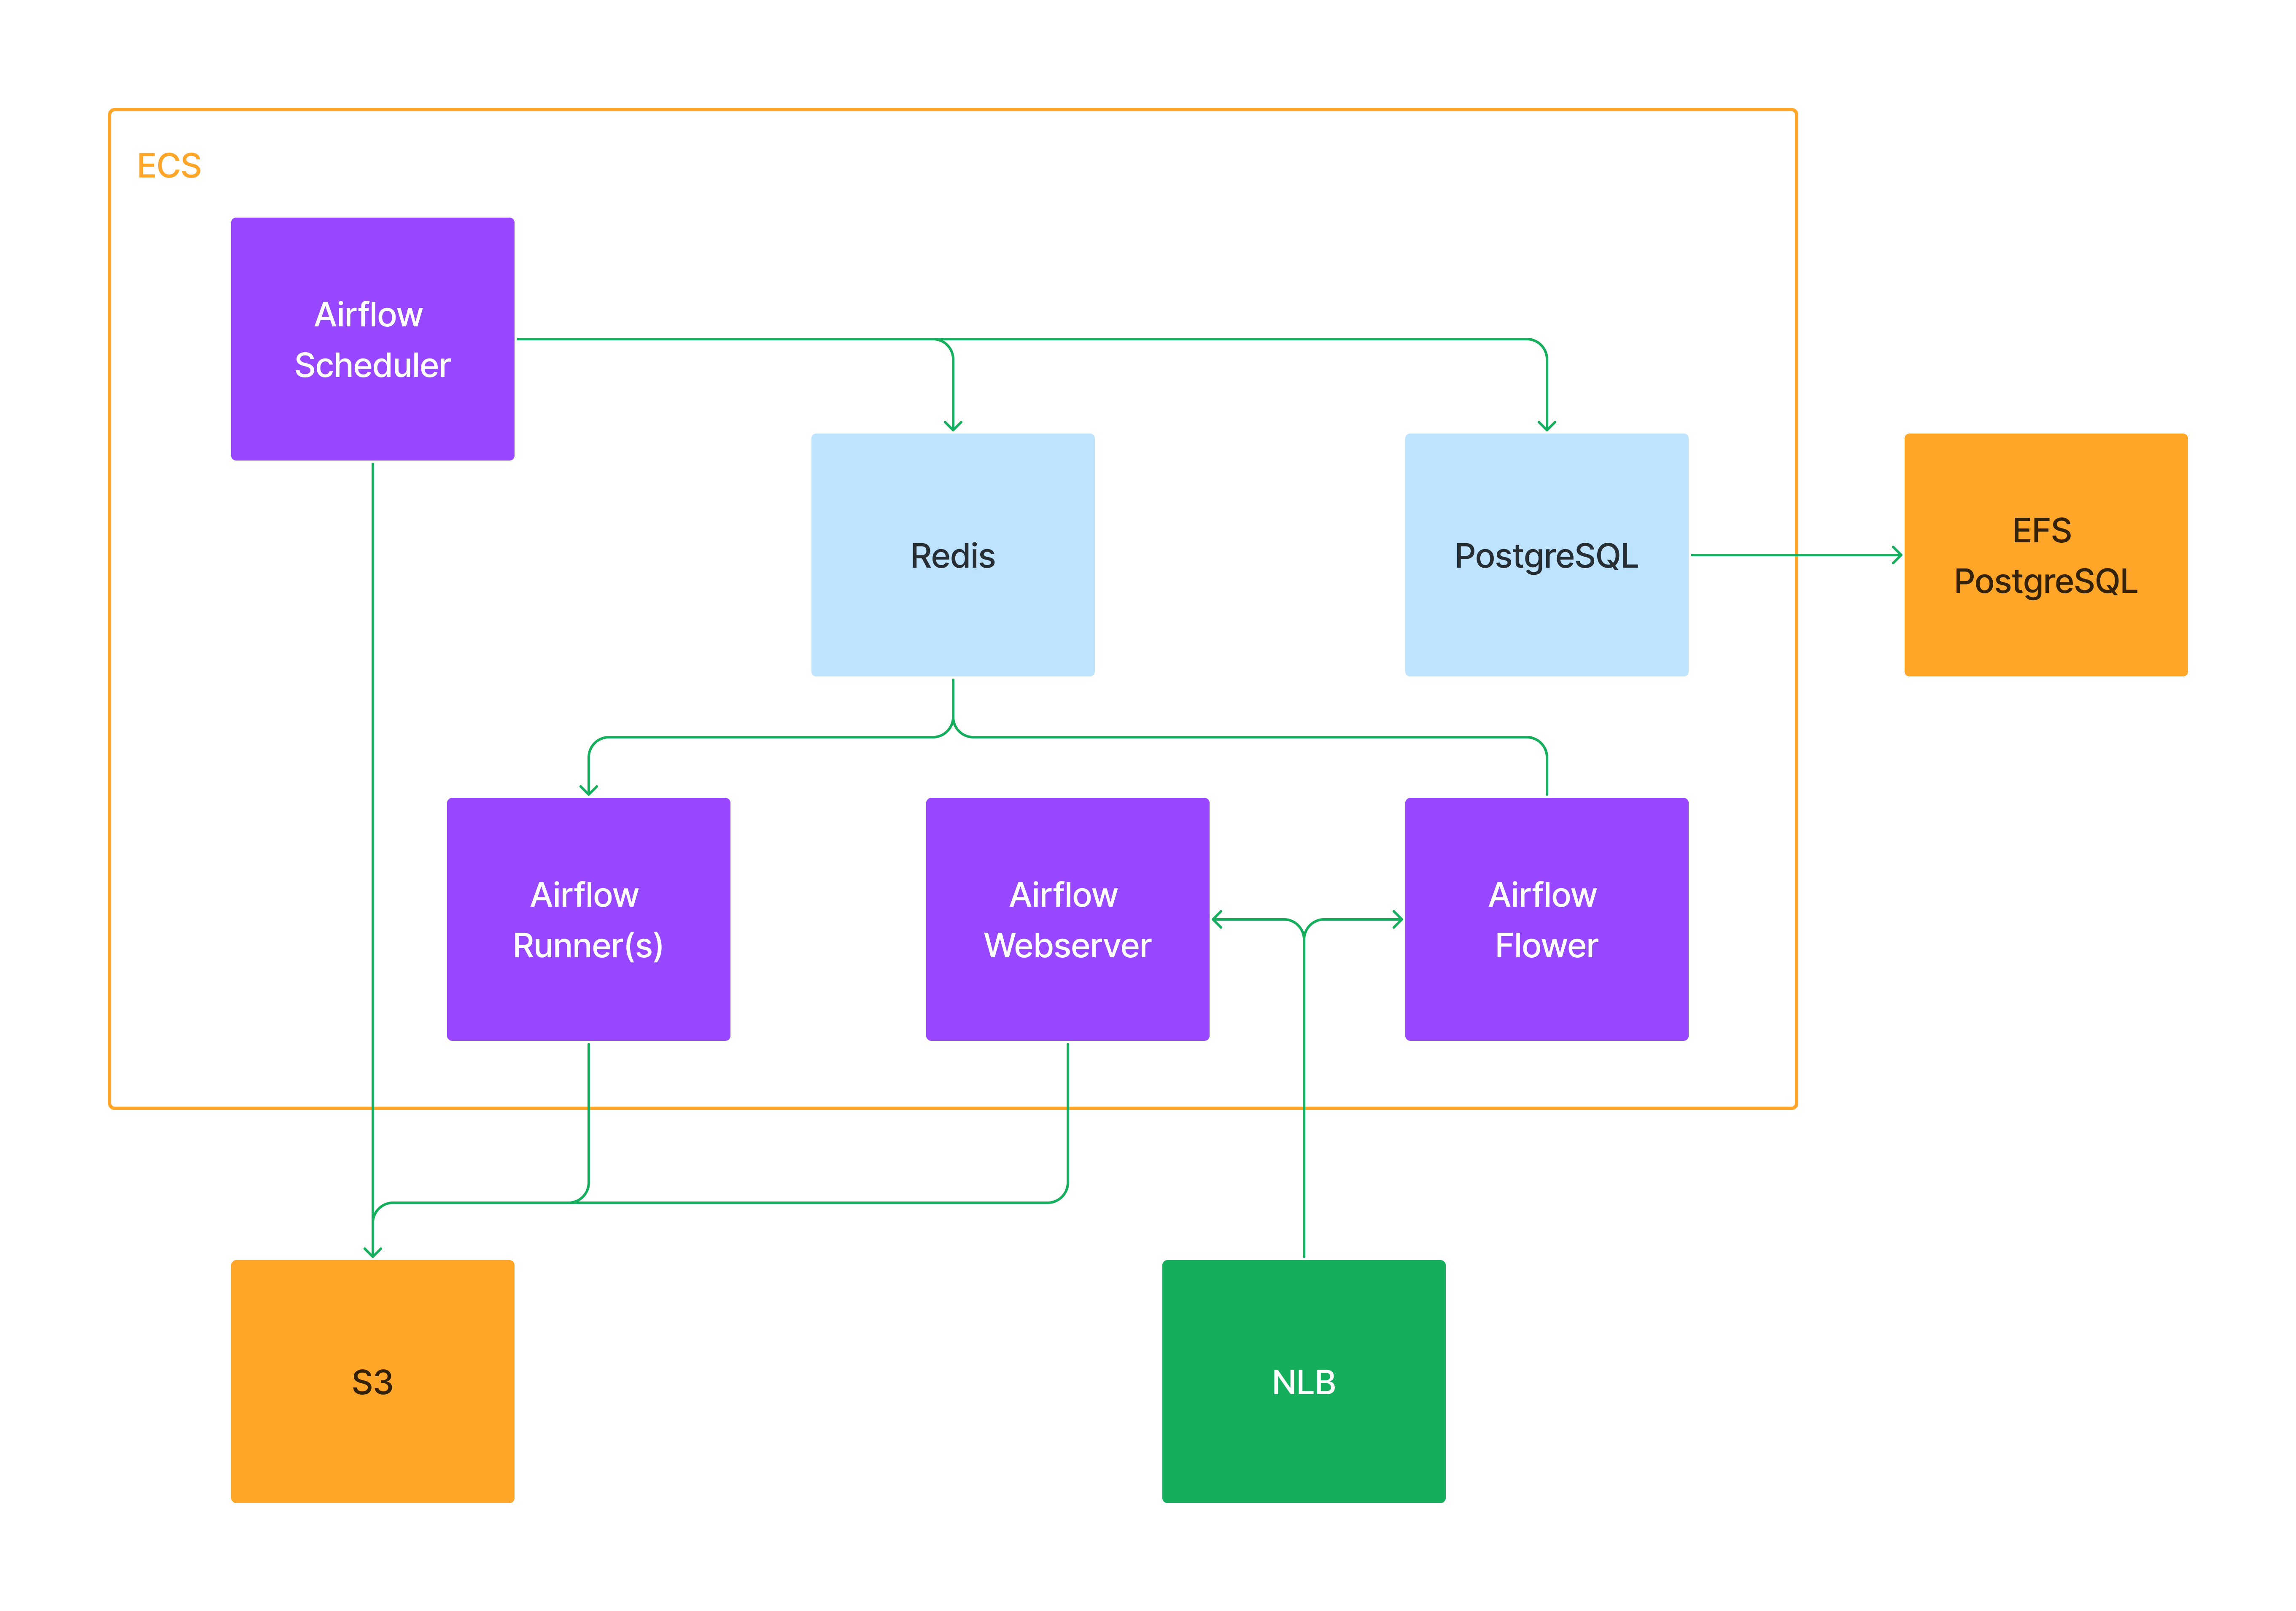
Previously on How to set up a containerised Airflow installation in AWS ECS using Redis as its queue orchestrator, I gave an overview of the infrastructure and Airflow components.
Now let's deploy all that.
This deployment will incur charges!!
AWS ECS, with 6 services. Scheduler, Webserver, Workers and (Celery) Flower on EC2 launch type using a mix of on-demand (scheduler, webserver) and spot instances (workers, flower). PostgreSQL and Redis on Fargate launch type.
AWS S3 bucket as DAGs repository.
AWS EFS, as a backing storage service for PostgreSQL.
AWS NLB for Airflow Webserver and Flower services.
Terraform to create all resources.
Already created AWS resources:
AWS CLI configured in your local using a set of credentials with permissions to create (and delete) resources in your account.
Terraform (I'm using 1.3.0 at the time of writing this article).
I have uploaded all the code I worked with to this repo.
Please keep in mind this will create resources in your AWS account that will consume credits and will be billed at the end of the month!
git clone https://github.com/marianogg9/airflow-in-ecs.git local_dir
local_dir/locals.tf
instance-type (for the EC2 ASGs).
ecs-ami (also for the EC2 ASGs launch templates, taken from AWS official documentation).
default_vpc_id (your existing VPC).
subnetsIDs (the existing subnets you want to deploy to, at least 1).
custom_cidr (your public IP, to access the Webserver and Flower services, and grants SSH access to - ECS - EC2 instances).
user_data_vars.region (AWS region where the S3 bucket is being created, used for s3fs-fuse mount configuration).
log_configuration.options.region (same as above, but for CloudWatch logs).
aws_key_pair_name (an existing EC2 key pair name. If left empty, SSH traffic is not allowed from outside the default VPC).
local_dir/terraform-backend.tf
local_dir/provider.tf
provider["aws"].region, the region you are deploying resources to.Again, please check the resources being created and the billing details!
$ cd local_dir
$ terraform init
$ terraform apply
Once all of the above is deployed, you can get the NLB DNS name from nlb_cname from Terraform outputs.
http://nlb_cname:8080
Give it a couple of minutes for the health checks to pass and authenticate with:
Username: airflow.
Password: you can check it in AWS Secrets Manager using Terraform output airflow_ui_password_secret_arn.
http://nlb_cname:5555
Now, let's run an example DAG (from Airflow's pipeline examples), but instead of downloading the data from Github, we will create a local file with the input data to have the DAG import it into the DB. I included the example-dag.py DAG file here as well.
Let's populate the input data first, running the following in your local console:
curl -s https://raw.githubusercontent.com/apache/airflow/main/docs/apache-airflow/tutorial/pipeline_example.csv > employees.csv
Then upload the data to the S3 bucket created before (use s3_bucket Terraform output):
aws s3 cp employees.csv s3://<s3_bucket>/files/employees.csv
Now upload the example DAG to the same S3 bucket, making it available to all Airflow components:
aws s3 cp example-dag/example-dag.py s3://<s3_bucket>/example-dag.py
After around 5 minutes, the DAG should be available in the UI. You might want to reload the browser to have it listed.
In the meantime, as a prerequisite, create a PostgreSQL connection (to be then used by the DAG). In Webserver UI > Admin > Connections > Add +.
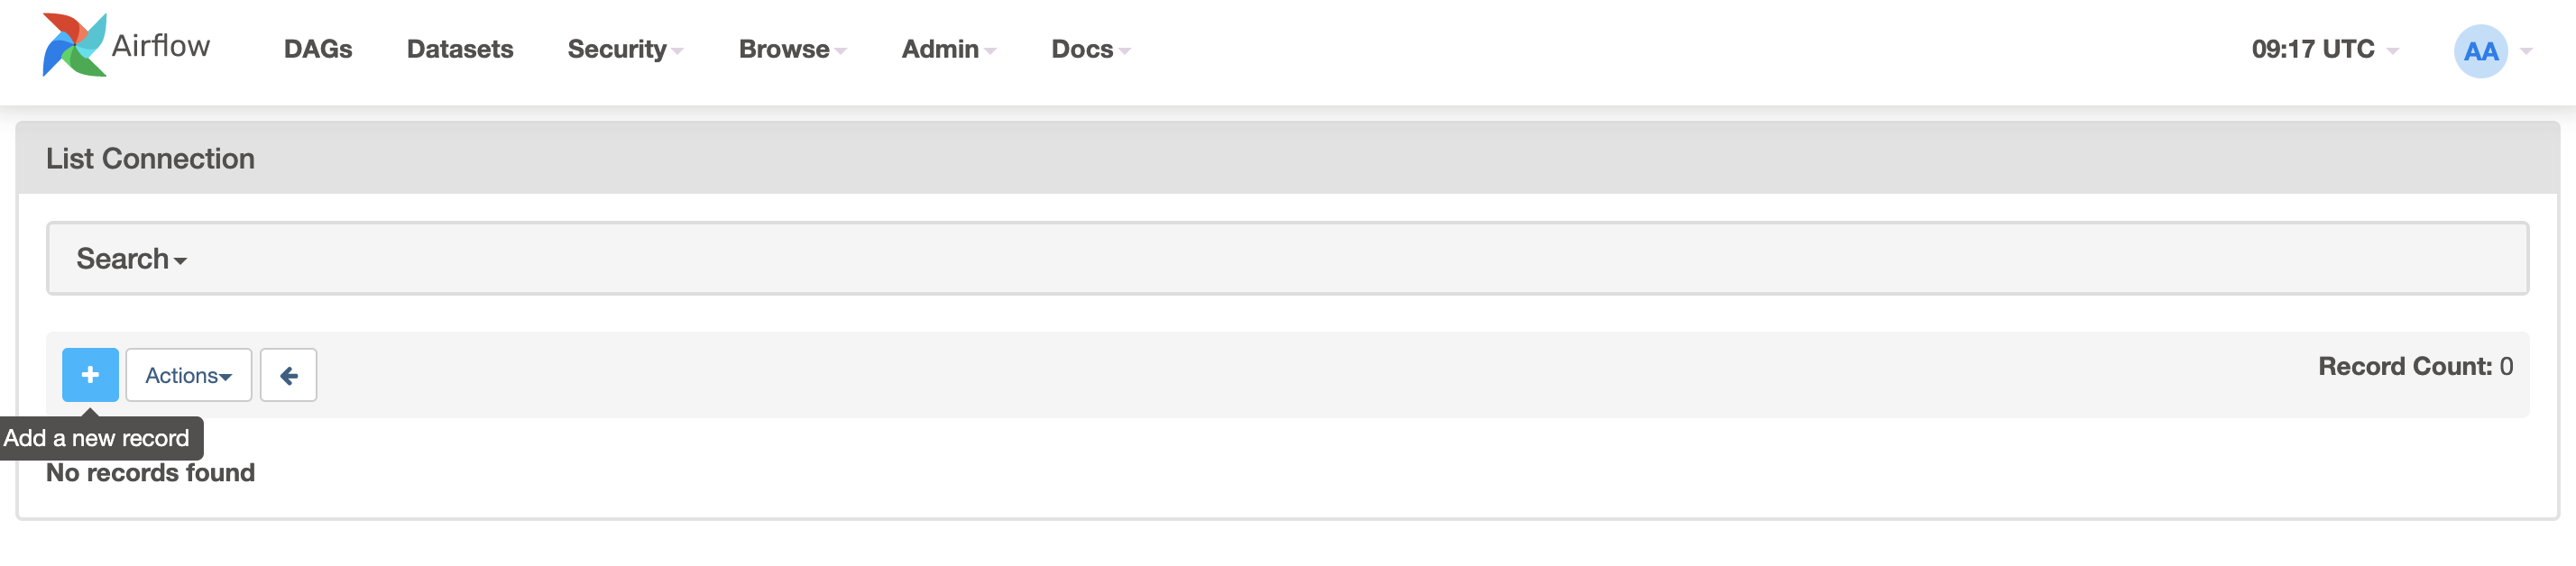
With the following parameters:
Connection Id: tutorial_pg_conn.
Connection Type: postgres.
Host: postgres.airflow.local.
Schema: airflow.
Login: airflow.
Password: airflow.
Port: 5432.
Then you can Test the connection, and if it passes, you can Save it.
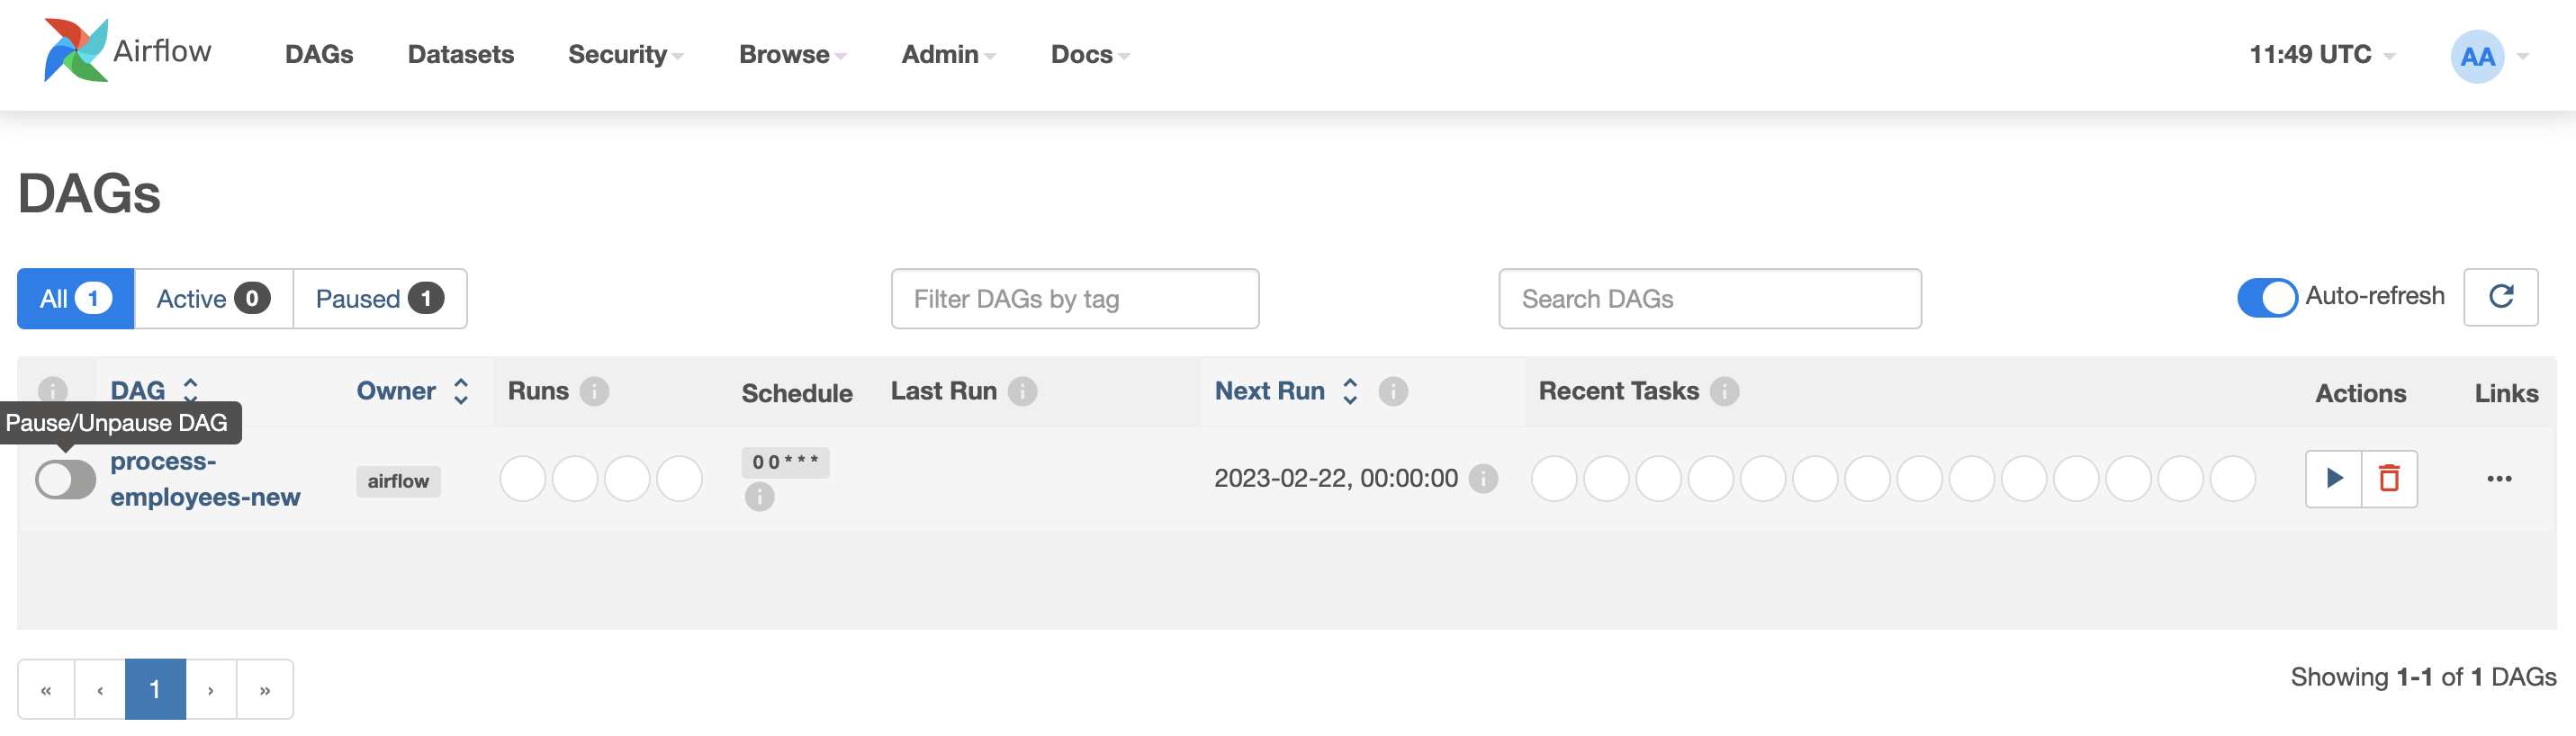
Now we need to unpause the DAG in the UI (and it will automatically run):
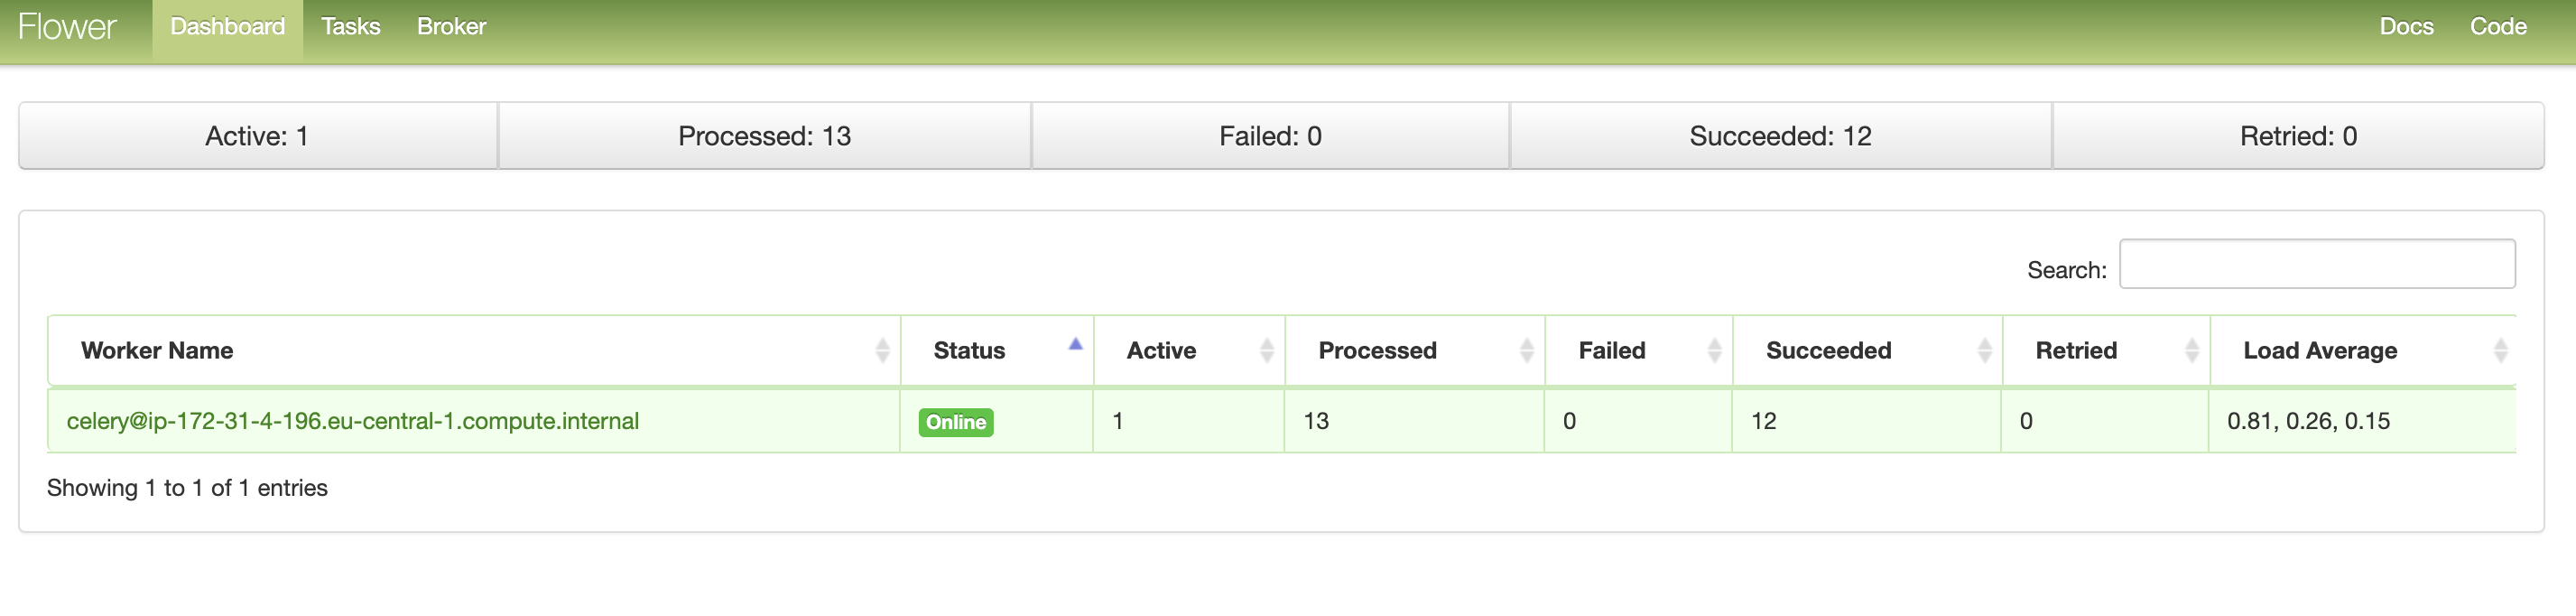
In flower UI, we will see the DAG task(s) being executed on the worker(s):
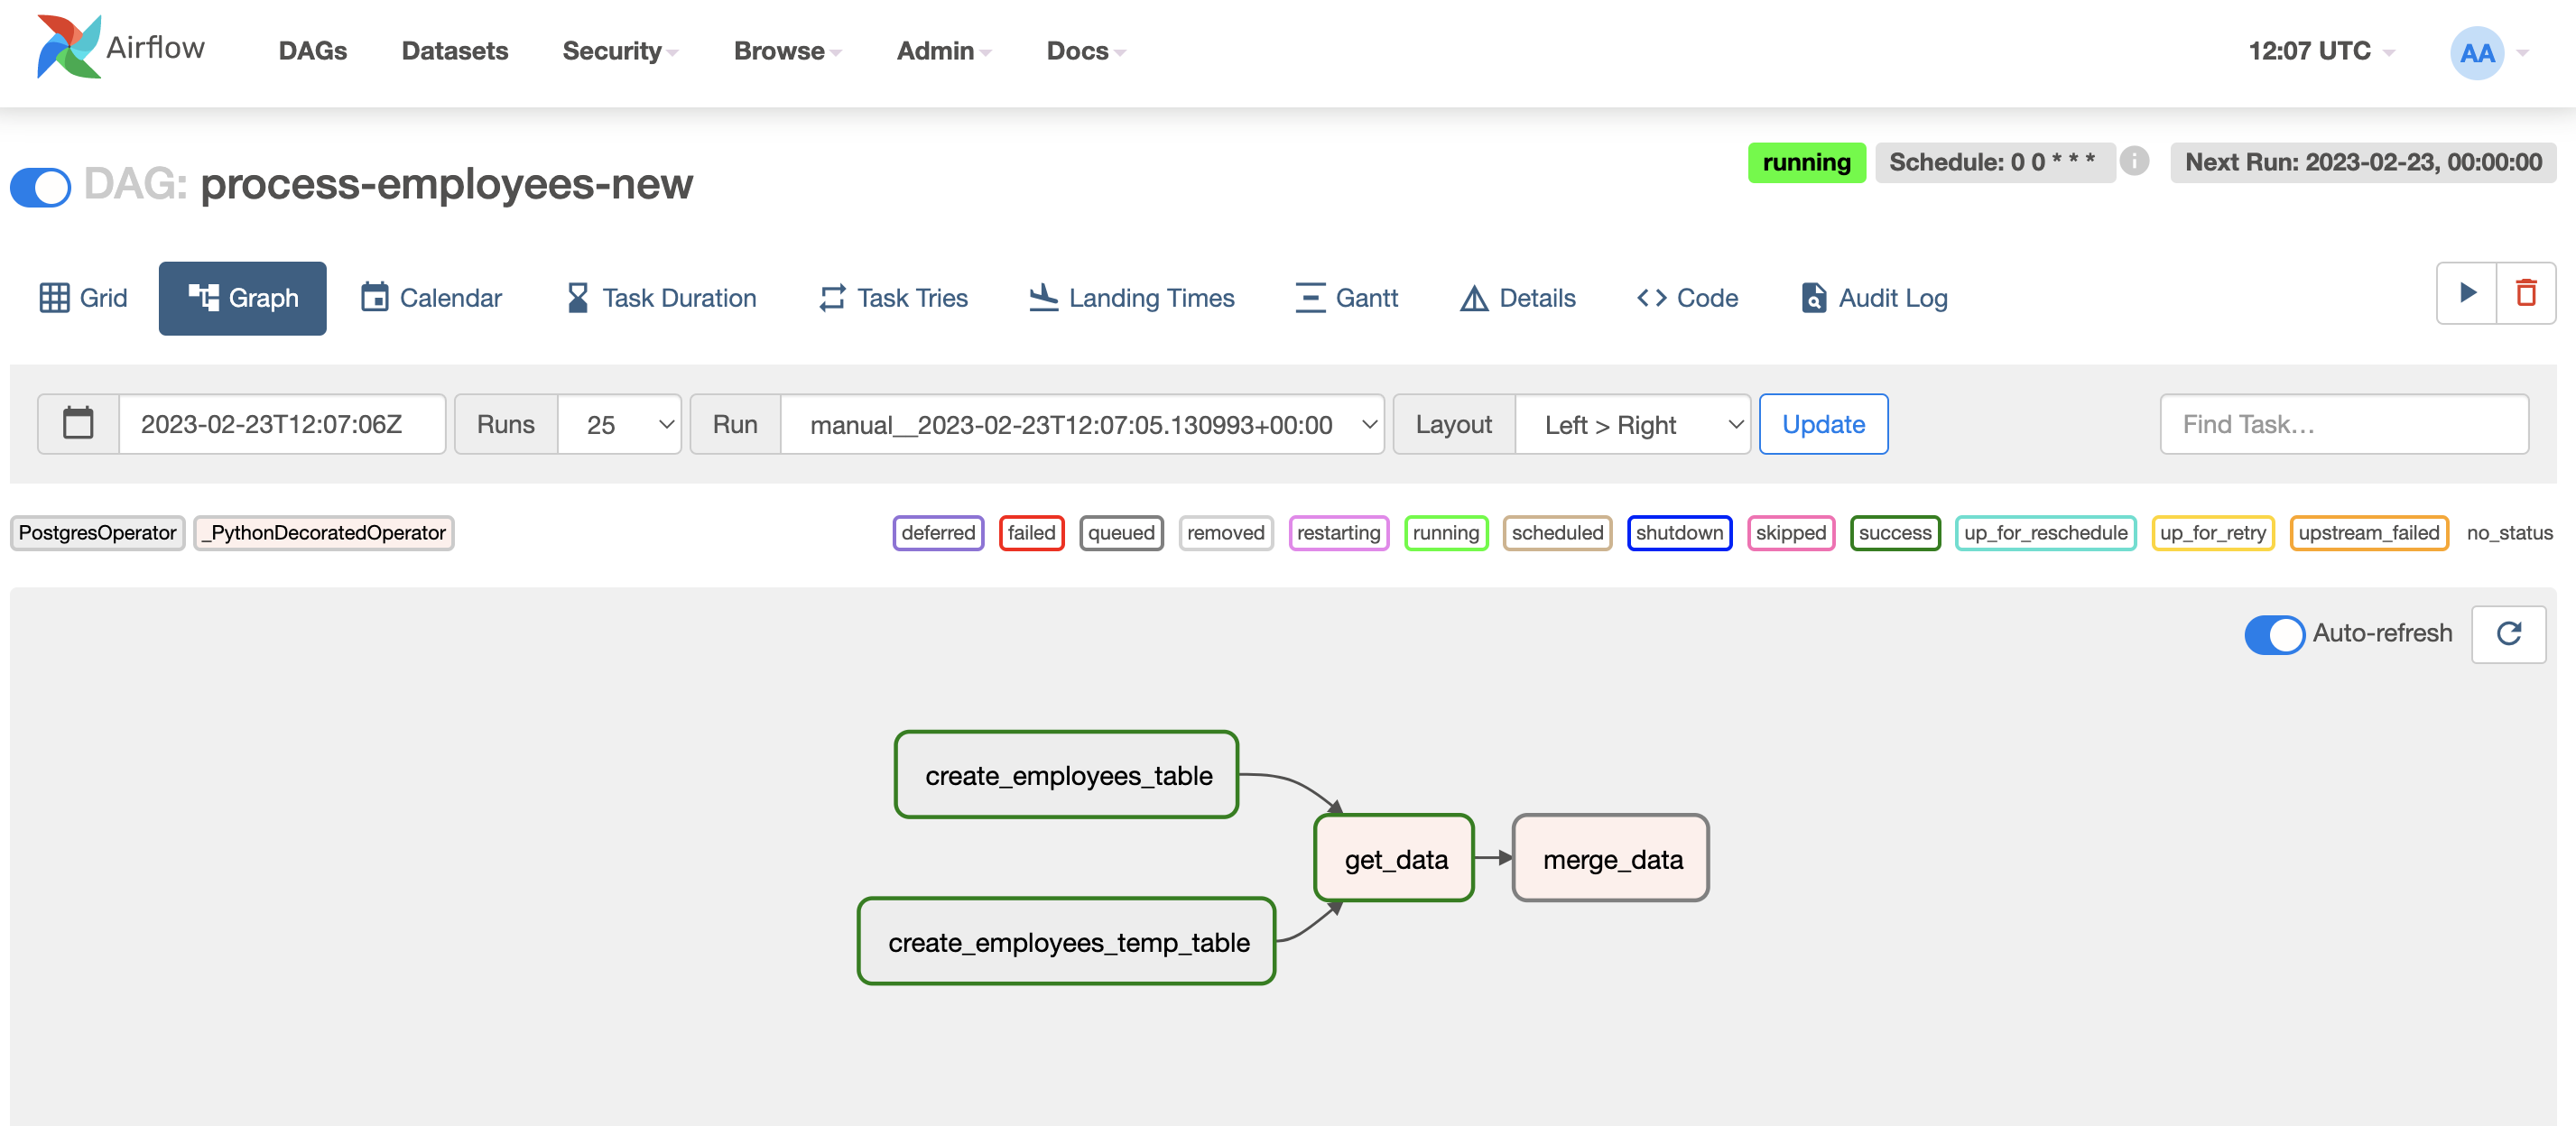
Also, we can have a look at the DAG tasks running in Webserver UI (clicking on the Last Run column link):
FIN! Now you can play around with other DAGs or start running your own pipelines.
While (re) implementing this solution, there were some forgotten details I (re) found on my way.
Modify health check retries for Redis container definition to =< 10.
Modify all containers environment variables to point to local service discovery entries (service.airflow.local).
docker-compose, there is a sidecar container running a service discovery resolution for local networking and DNS. I replaced this container with a hostname fix, from service to service.airflow.local in each container environment variables.Add internal traffic rule (VPC CIDR, all ports) to the default Security Group.
Give at least 512cpu + 1024 ram to Webserver task definition.
Add ECS_INSTANCE_ATTRIBUTES environment variable in the ASG launch template UserData to set a custom value and differentiate core (on-demand) and worker (spot) instances.
placement_constraint filter in each ECS service definition.Ah, yes, s3fs-fuse driver. When trying to use iam_role flag, it only works by compiling from source using a specific version/commit: https://github.com/s3fs-fuse/s3fs-fuse/issues/1162#issuecomment-536864032 + https://github.com/s3fs-fuse/s3fs-fuse/wiki/Installation-Notes#amazon-linux.
This one took a while. Turns out there is a bug (https://github.com/s3fs-fuse/s3fs-fuse/issues/1196 closed in Feb 2020) preventing the -o iam_role flag to work due to a recursive call to CheckIAMCredentials method.
The problem is that running s3fs-fuse mount command with -f -o curldbg flags will just hang and not show any useful information. After a while of trying different flags, I gave it a try using a set of IAM credentials (access:secret); it worked instantly. Now this implementation is using version 1.84.
v1.86 was released in Feb 2020, that's why I never faced this issue up until now.
The working set of steps is included in the UserData script for both core and workers ASG launch templates.
In both core and worker ASG launch template UserData, I used https://developer.hashicorp.com/terraform/language/functions/templatefile to add external vars (like S3 bucket name and IAM instance profile name).
As done with the UI admin user, PostgreSQL connection credentials can be parametrized using AWS Secrets Manager secrets + env vars in the task definitions:
For PostgreSQL tasks: POSTGRES_USER & POSTGRES_PASSWORD.
All Airflow's container definitions: AIRFLOW__CORE__SQL_ALCHEMY_CONN by passing in a Secrets Manager secret ARN.
Many more Airflow configurations can be overwritten using environment variables.
To have a guideline for the resources and dependencies I had to create, I used the docker compose version of this implementation. This native Docker Compose integration with AWS using CloudFormation will give you a way of deploying directly in AWS from docker compose command line.
It also comes with a dry-run (docker compose convert) type of feature where you can get a look at the actual CloudFormation template that is to be applied. I used this template to create all the Terraform resources.
The official Airflow documentation example uses a DAG fetching the CSV input data from a GitHub repo. When I was running this implementation, I faced an issue where every task run would be (rendered and) passed to workers replacing airflow with ***. Since the get_data task uses an airflow repository to fetch data from, the used URL would get rendered with *** instead of the word airflow, making it invalid, which then made the task hang and fail.
In favour of practicality, I decided to replace that fetch with a local CSV as input.
You can always check the task logs in /opt/airflow/logs/ where all components will add specific run information.
When you are ready to clean this all up, you will need to delete any files and folders in the S3 bucket manually first (otherwise, Terraform will complain about the bucket not being empty and fail with BucketNotEmpty: The bucket you tried to delete is not empty).
Then run:
$ terraform destroy
It will take a while to finish up, mostly because of the connection drain times on the NLB target groups vs ECS services and the EFS volume/mountpoints.
Add a reverse proxy https://airflow.apache.org/docs/apache-airflow/stable/howto/run-behind-proxy.html.
Deploy in Kubernetes.
Use EFS as DAG storage instead of S3.
This implementation repository.
Thank you for stopping by! Do you know other ways to do this? Please let me know in the comments, I always like to learn how to do things differently.