All right then, keep your secrets in Git with SOPS

I'm Mariano, I am from 🇦🇷 and live in 🇳🇱. I am a Cloud Engineer 9-5 and many other things 5-9.
Wait, what? Don't panic, SOPS will encrypt them for you.
Big NO NO

Secrets (a.k.a. sensitive values), such as passwords or any other potentially harmful information must be protected, we all know that.
That's why you should avoid sharing those or pushing them to a public (or even private) code repository. Right? Well, yes and no.
But where do you store them?
There are many vault-like services such as Hashicorp Vault, AWS Secrets Manager, GCP KMS, Azure Key Vault and the well-known credential storages out there like 1Password.
All of the above offer a separate secure location to isolate the secrets from the code referencing them, but also all of them need an extra fetch process; how do you get the actual value? you add a call to the secrets store using the corresponding method and you will have the secret value exported to your app.
Wanna save a step? Enter SOPS.
Why SOPS?
Because it offers a simplified version of keeping sensitive information. You can directly store the values in your code and use one of AWS KMS, PGP, GCP KMS, Azure Key Vault, Hashicorp Key Vault and age (I did not know this one) to encrypt and decrypt. No need to push/pull or store the secrets somewhere else.
Example

Let's sample this in a Kubernetes local scenario, using:
Helm (Helmfile) to deploy a sample chart + Minikube hosting a simple Kubernetes cluster in your local.
- Please refer to this article about Helmfile + Minikube for a full installation walkthrough. For this tutorial, I will assume both are installed in your environment.
AWS KMS key.
SOPS.
Here you can find the reference code and a few Terraform templates to create KMS and IAM resources. I will be using the AWS console for this tutorial, but I added a walkthrough for Terraform here.
KMS
Manually in the AWS console:
Access AWS KMS service.
Go to Customer-managed keys and click on Create key.
Select Symmetric + Encrypt and decrypt options, then Next.
Give it an alias and Next.
Select a Key administrator and Next.
Select a Key user (this step can be done later, after creating the IAM user), Next.
Finish.
IAM
Manually in the AWS console:
Access IAM service > Users.
Add Users.
Give it a name > Next.
Select Attach policies directly > and then Create policy (this will open the new policy wizard).
In the new policy wizard, select JSON and then paste the following JSON policy definition > Next:
 {
     "Version": "2012-10-17",
     "Statement": [
         {
             "Sid": "VisualEditor0",
             "Effect": "Allow",
             "Action": [
                 "kms:Decrypt",
                 "kms:Encrypt",
                 "kms:DescribeKey"
             ],
             "Resource": "arn:of:your:kms:key"
         }
     ]
 }
Give the new policy a name and then click on Create policy.
Now go back to the IAM user creation wizard (previous tab) and click the refresh icon to update the available policies list. Then enter the new policy name in the search field and select it > Next > Create user.
Now go back to the KMS service, select the key you created previously and select Add in the Key Users section of the key.
- Select the IAM user created before > Add.
Baseline deployment with Helmfile
First, clone the repo:
git clone https://github.com/marianogg9/playing-with-sops.git
Once you have Minikube running and Helmfile installed, let's deploy the sample httpbin app in the cluster:
cd playing-with-sops/helmfile/
helmfile -e example apply
This will deploy httpbin app in your local Kubernetes environment, including a pod, a service, a service account and a secret (we will use it later).
Let's see how environment variables look in the freshly created pod (we will use it to compare with a later step, trust me):

And now: THE SECRETS

Helmfile supports secrets by using helm secret plugin to manage and inject sensitive information into a given release values.
The caveat here is those secret values are going to be shown in plain text in the
helmfile difforhelmfile applyoutputs, so be careful!Keep reading, there is a workaround for that.
Helm-secrets plugin
You will need to install helm-secrets plugin:
helm plugin install https://github.com/jkroepke/helm-secrets
SOPS
Installing:
brew install sops
Let's use it now! First, we need to create a .sops.yaml with the following content:
creation_rules:
  - path_regex: \.yaml$
    kms: 'arn:of:your:kms:key'
This is a global configuration file that SOPS will use as a default when encrypting/decrypting files. You can set a regex for filenames and locations and a KMS ARN to use. That KMS is the one we created before.
The above example will accept any names anywhere ending in .yaml so it doesn't matter where you create this specific config file.
Remember always to configure your local AWS CLI to use the KMS Key User we created before. See this article on how to set up and use it.
Next, create secrets.yaml file within helmfile/ directory, by running the following:
sops secrets.yaml
This will open a text editor with prefilled sample values. Replace the content with:
my_var: a top secret value
my_other_var: not that sensitive, but still please don't tell anyone!
When you save and close this file, SOPS will encrypt it automatically. You can have a look at its content now, SOPS added metadata referencing the KMS (ARN) used, a timestamp and some more.
Helmfile takes over
Now for the Helmfile part, let's add secrets: section to the release in helmfile.yaml, as follows:
As a result, Helmfile will merge values.yaml and secrets.yaml as one and then use it to populate the charts templates to be deployed (in charts/httpbin/templates/).
Let's modify the deployment template to make use of the new secrets, by replacing the environment variables values with references to secrets in secrets.yaml:
Now let's see what Helmfile tries to do (helmfile diff):
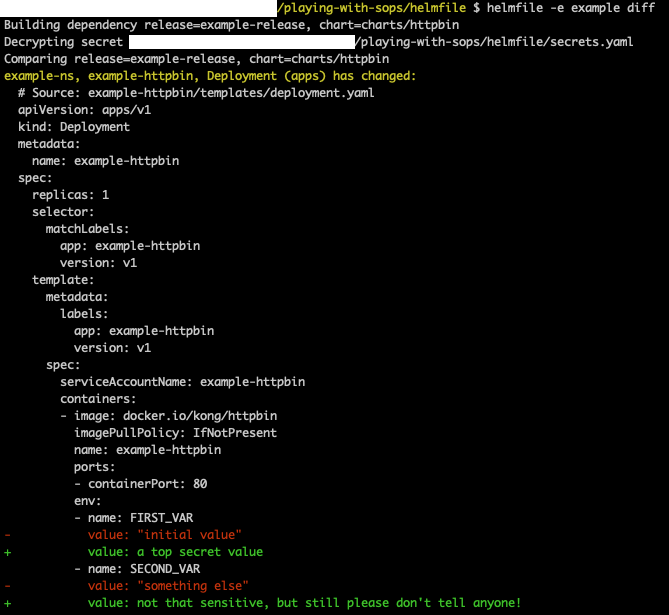
As you can see in the output, it is first decrypting the secrets file we specified: Decrypting secret /your_local_path/playing-with-sops/helmfile/secrets.yaml.
Ok, let's apply (helmfile apply) and then see what changed in the deployment:

Now both environment vars values were changed to the secrets (encrypted) values.

A step further for CI/CD
What if you are trying to implement this in a CI/CD pipeline where logs are printed on stdout and so are your secrets?
Well, then you might want to use a Kubernetes secret definition. In this case, helm secrets will avoid showing secret values in plain text.
Use a Kubernetes secret object to manage a sensitive value that you do not want to be printed in plain text in a CI/CD pipeline log.
You can create a new secret.yaml template definition in helmfile/charts/httpbin/templates/ (I included an example in the repo as well):
The data section contains both secrets (from secrets.yaml) and encrypts them to allow Kubernetes API to accept their format.
Then you can reference these secret keys in deployment.yaml template:
If we check what Helmfile does:
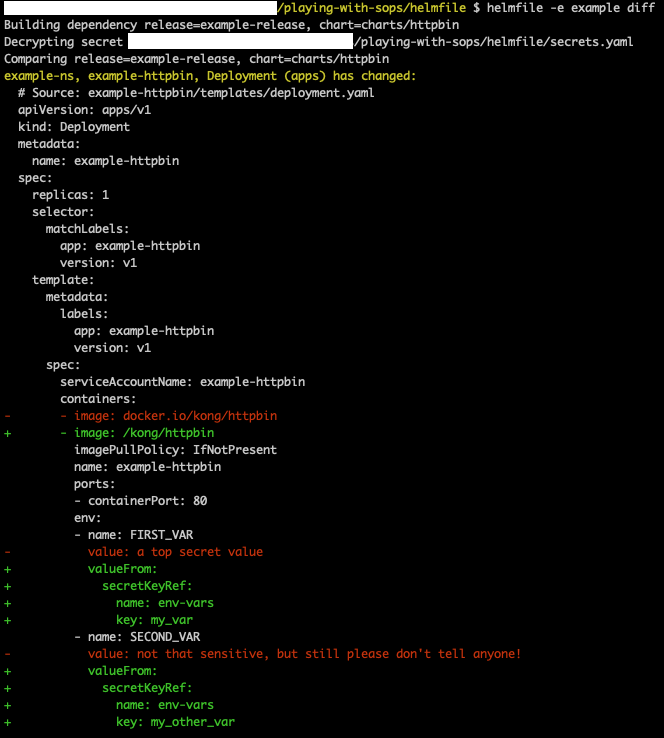
Now the values are effectively taken from a Kubernetes secret instead of directly from secrets defined in the Helmfile release.
Go ahead and run helmfile -e example apply to deploy the changes.
Let's now modify secrets.yaml values
sops secrets.yaml
I removed the last character from both my_var and my_other_var in secrets.yaml - it doesn't really matter the change, it is just an example. Save and close the file to have SOPS re-encrypt it.
And now let's see what Helmfile tries to do:
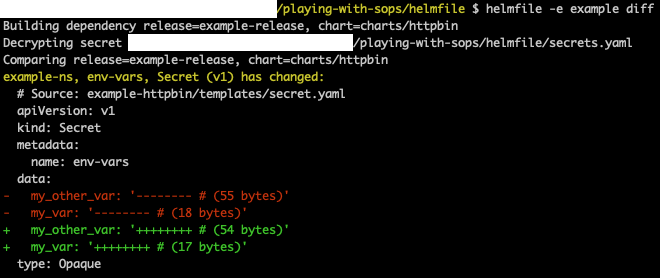
There are no secrets shown in plain text anymore!

Conclusion
You can manage secret values directly in Git now, without extra steps to fetch from remote. It is a simple concept and it is practical if you don't have that many sensitive values to justify an external platform setup for them. Of course, it is a possible tool for a given use case, it all depends on the context.
I found out about this way of managing secrets when I started working with Helmfile, it is pretty well integrated and just works. Simplicity, I like it.
Please have a look at all SOPS features.
Helmfile also offers secrets remote fetch natively as well.
References
Thank you for stopping by! Do you know other ways to do this? Please let me know in the comments, I always like to learn how to do things differently.